How to Upload Google Search File to Wordpress Blog
Themeisle content is complimentary. When you purchase through referral links on our site, we earn a committee. Learn More
Google Search Console gives you access to a broad range of SEO tools. However, before yous tin use Search Console, you'll need to do a Google site verification for your WordPress website.
Fortunately, verifying your site with Google Search Console is relatively straightforward. You can edit your website's files straight or use an external plugin. By doing so, you lot can increase your site'due south visibility and attract new readers to your content.
In this article, we'll explore five different methods for verifying your WordPress site with Google Search Console. For each strategy, we'll explain step by step how to consummate the process. Hither are the five methods that nosotros'll cover – you can click the link to jump straight to a specific tutorial:
- Upload a file to your server
- Add an HTML tag to your site'southward code
- Use Google Analytics or Tag Manager
- Add a TXT record to your domain'south DNS management
- Use the Yoast SEO plugin
Let's get started!
1. Upload a Google site verification file to WordPress
Ane of the easiest ways to verify your WordPress website is by uploading a file to your server. You can do this with a File Transfer Protocol (FTP) client or via cPanel's File Manager tool if your host uses cPanel.
Here'south how to do it:
First, y'all'll need to navigate to Google Search Panel. Hither, you'll immediately see the option to utilize domain or URL prefix verification:
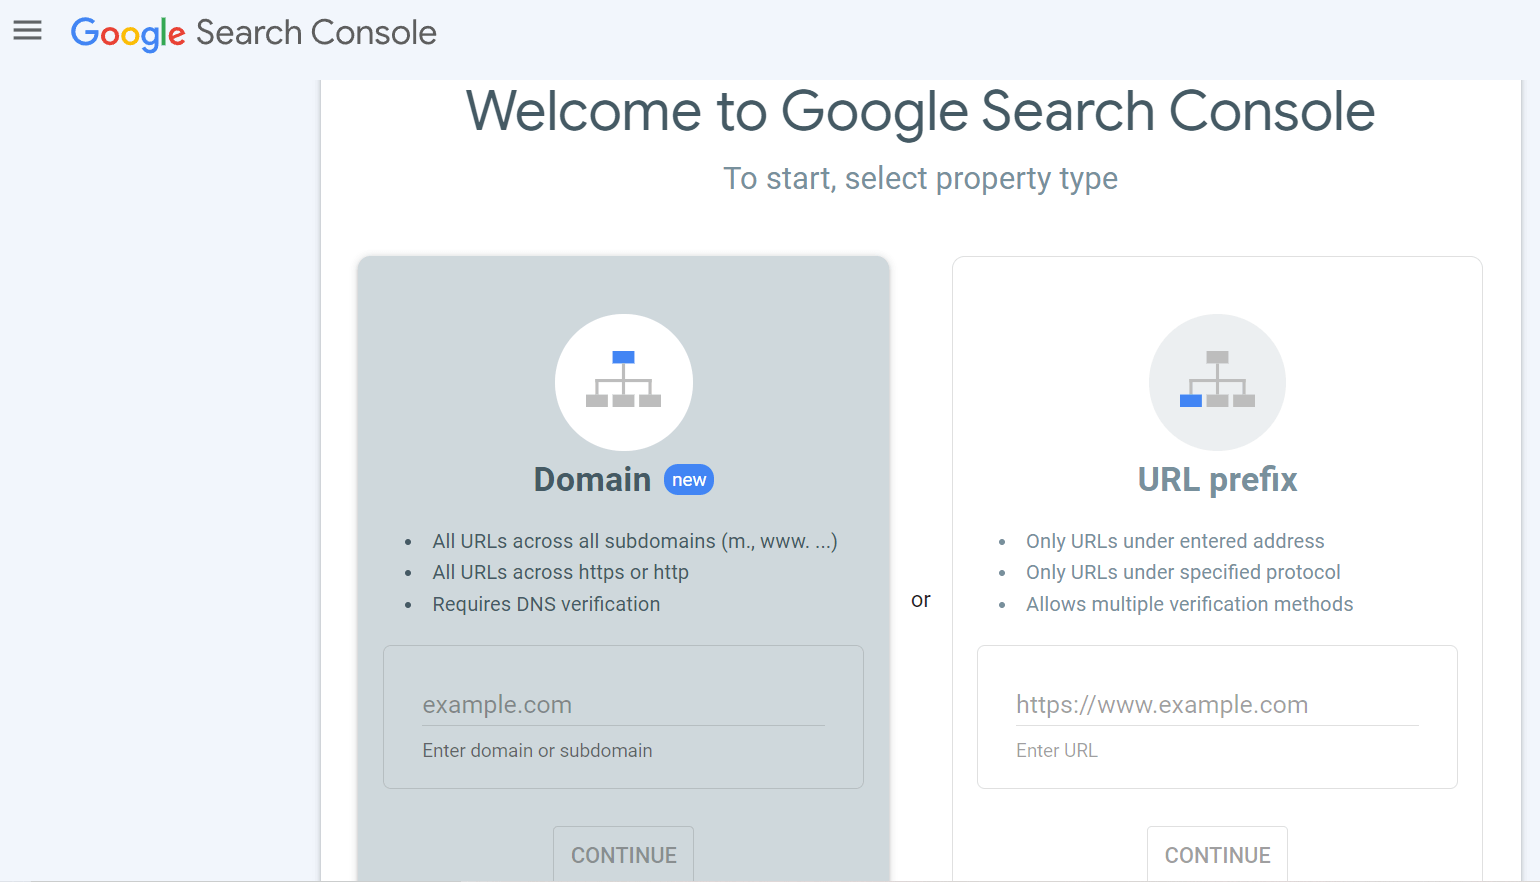
For this method, y'all can select URL prefix and enter your WordPress website's URL. So, click on Go along, and you lot'll see a pop-upwardly screen:
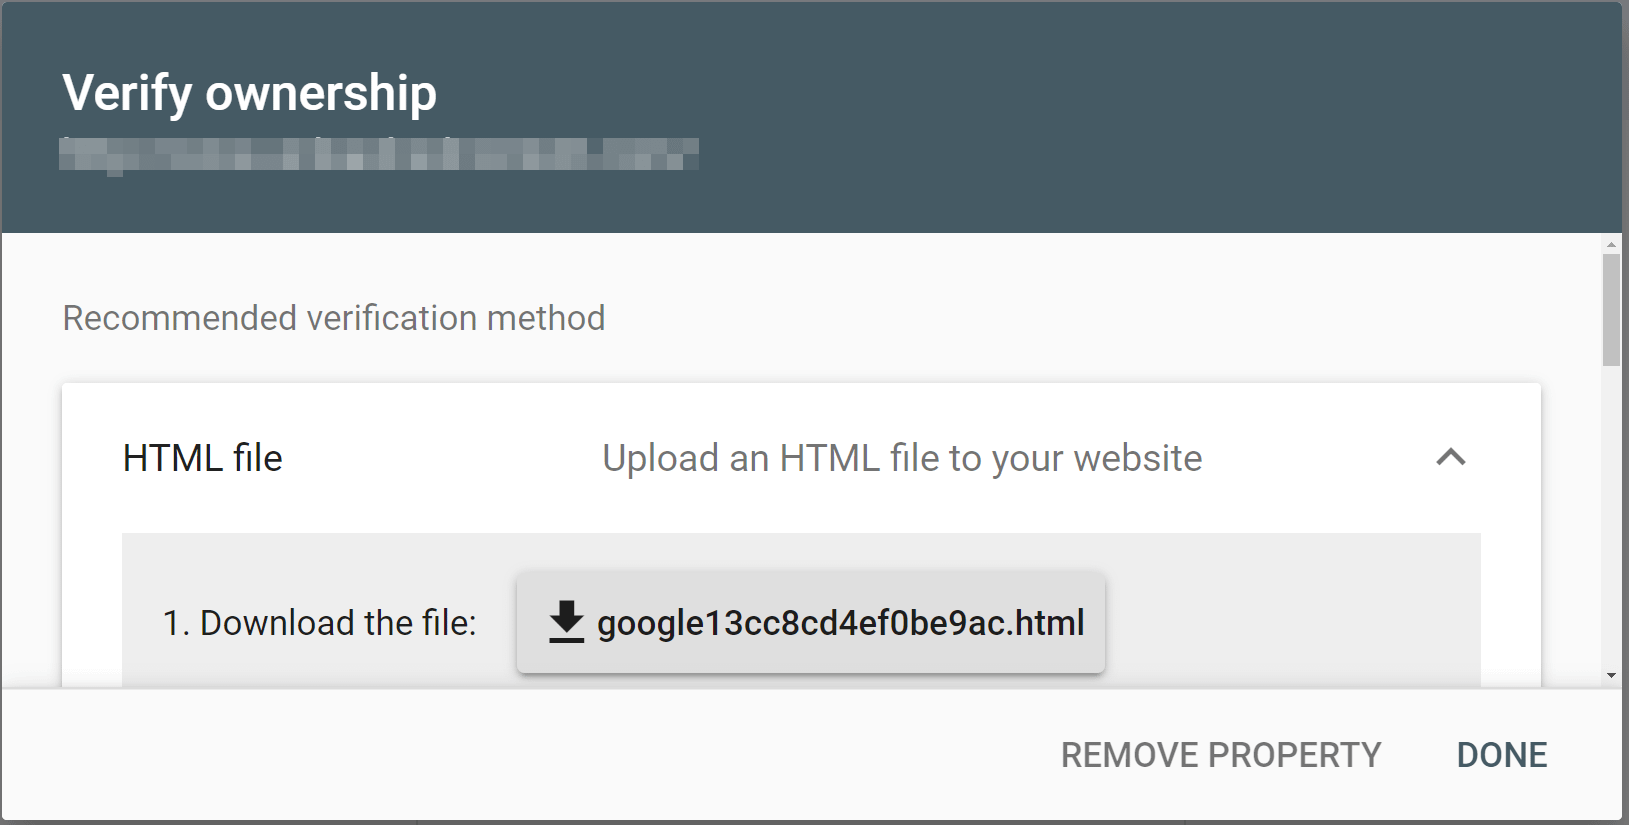
The recommended verification method is the ane we'll be using for this part of the tutorial. Click on the file next to Download the file.
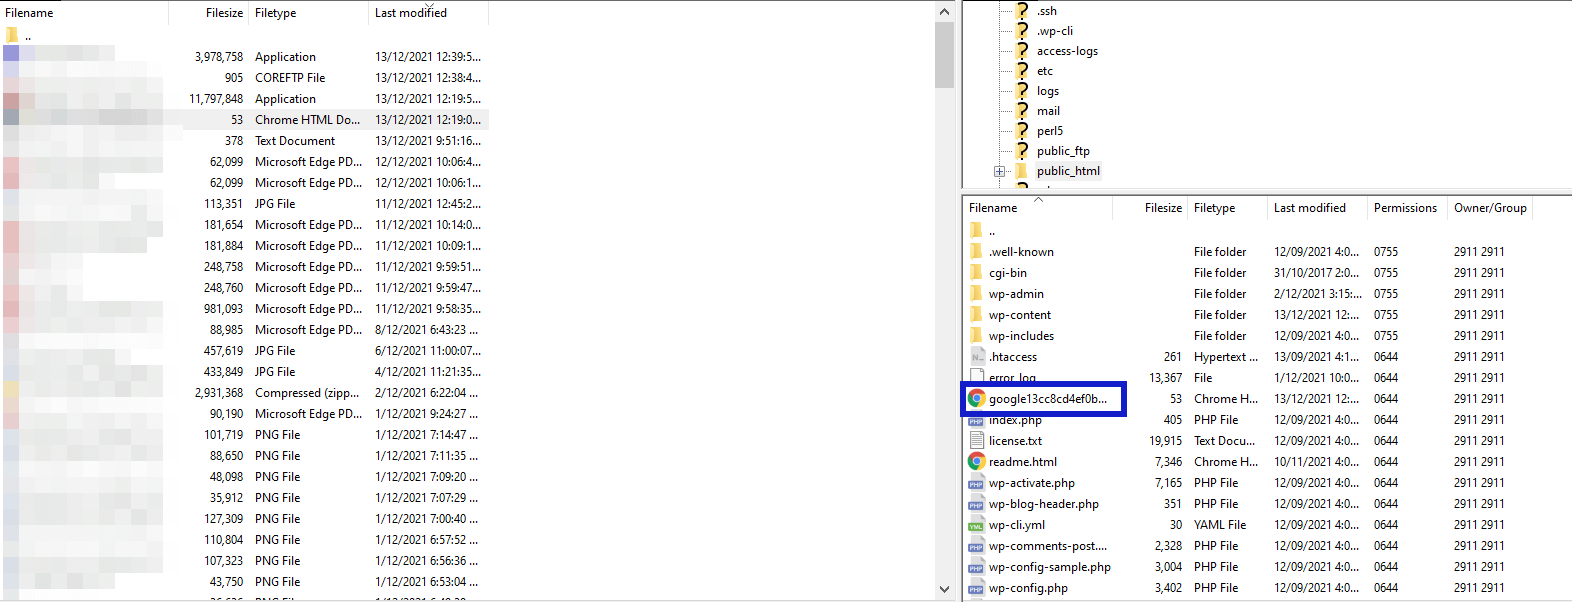
Side by side, open up upwardly your FTP client or cPanel's File Managing director tool. If you're not sure how to connect via FTP, bank check out our full guide to WordPress FTP.
You'll want to discover your root folder, which is the 1 that holds other essential files such as wp-config.php. Upload the file that you downloaded from Google Console, and information technology volition appear in the root binder:
Then, navigate back to Google Search Console and click on VERIFY. Y'all should at present encounter a success bulletin that looks like this:
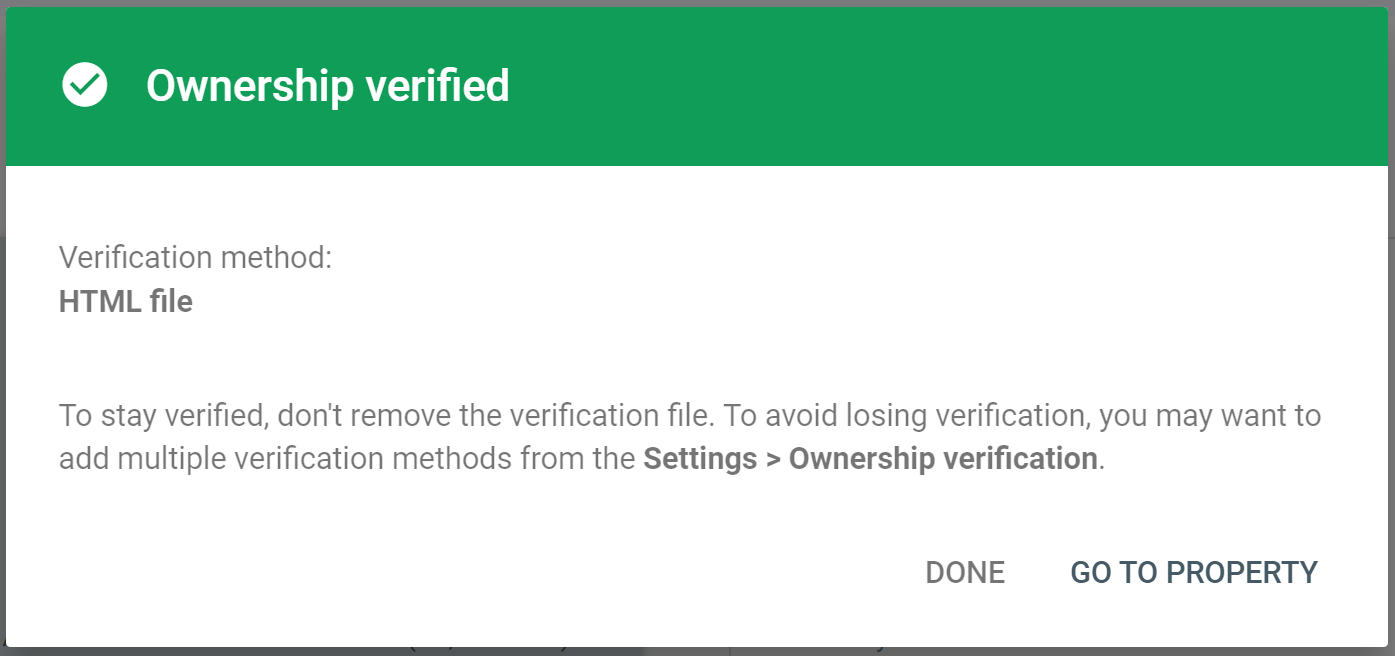
It's that easy! Your website is now connected to Google Search Panel.
ii. Add an HTML tag to your WordPress website
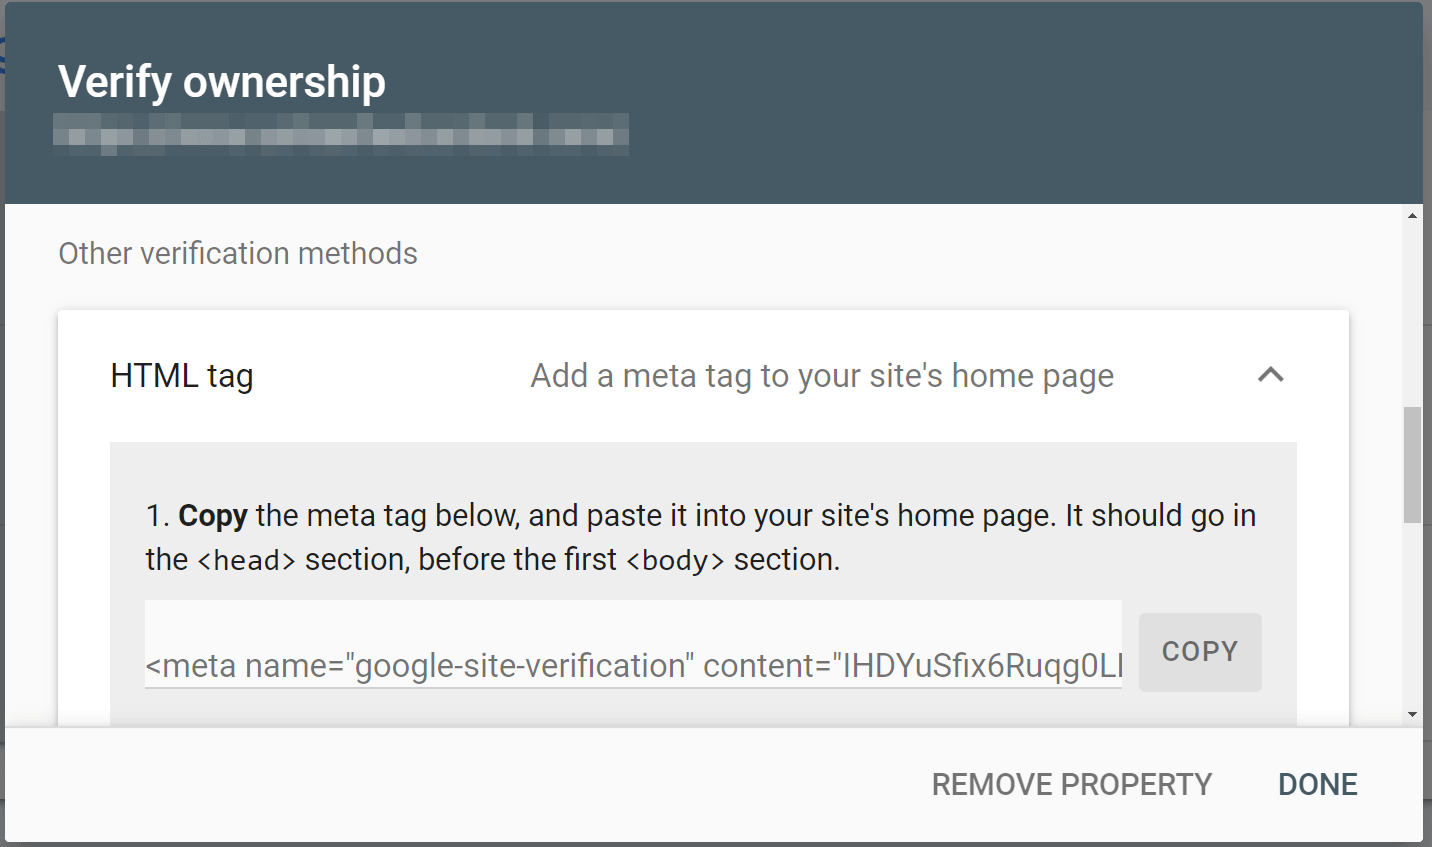
Alternatively, y'all might cull to verify your site using an HTML tag. This is a small amount of lawmaking that you add directly to the <head> tag in your website's files.
If you lot feel more comfortable with your WordPress dashboard than with an FTP client, you lot might prefer to use this method. Even so, acquit in heed that this strategy involves editing ane of your WordPress core files. Therefore, you lot'll desire to make a backup of your website in case you make any errors.
Firstly, navigate to Google Search Console, select URL prefix, and enter your site's URL. Click on Go on and curlicue downwardly to Other verification methods in the pop-up box. From here, open the HTML tag dropdown menu to re-create the meta tag for your website:
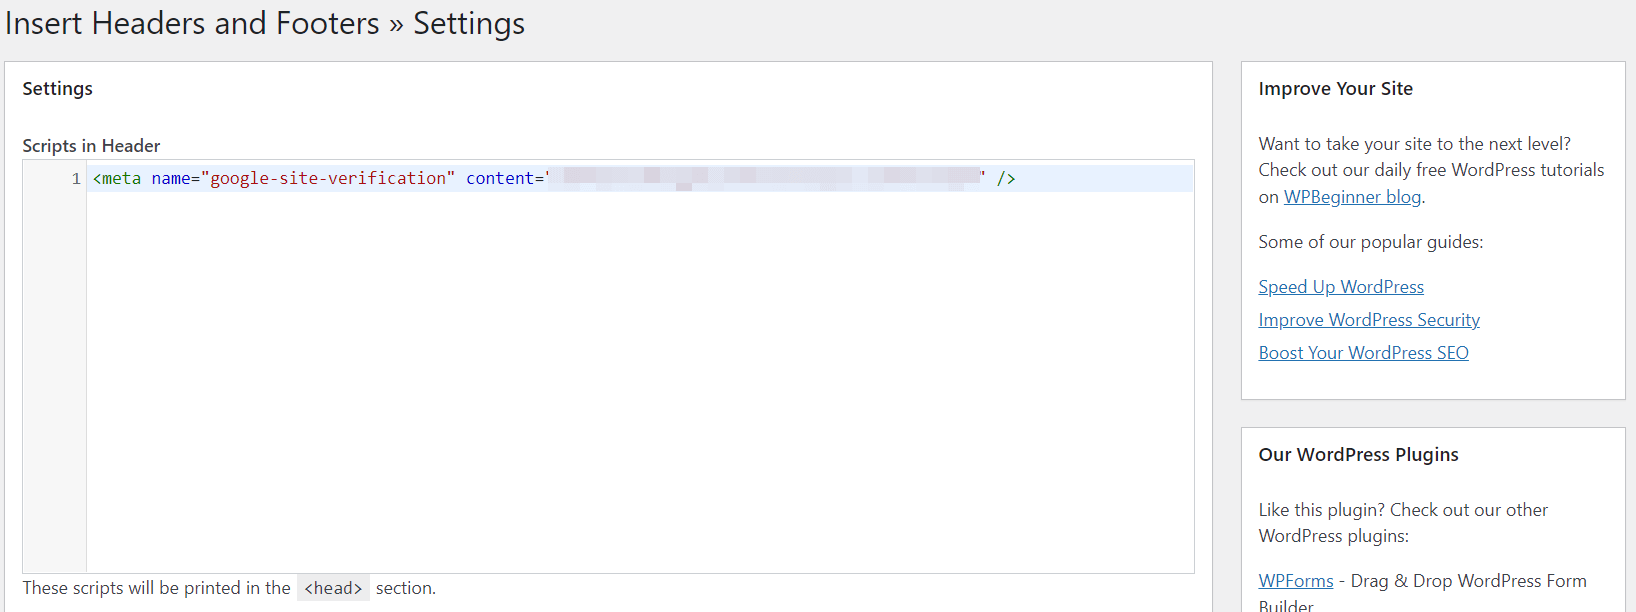
Adjacent, you'll demand to head to your WordPress dashboard to install and activate the Insert Headers and Footers plugin.
We recommend using this plugin instead of manually editing your header file every bit the procedure is faster and you won't need to create a child theme.
In one case you've installed and activated the plugin, you tin can navigate to Settings > Insert Headers and Footers. Then, you can enter the Google Search Panel verification tag directly into the Scripts in Header box:
Click on Salve to add the meta tag to your site's header. Then, become back to Google Search Console and select VERIFY. If your website is verified correctly, you'll see a green success message.
3. Verify your site with Google Analytics or Google Tag Manager
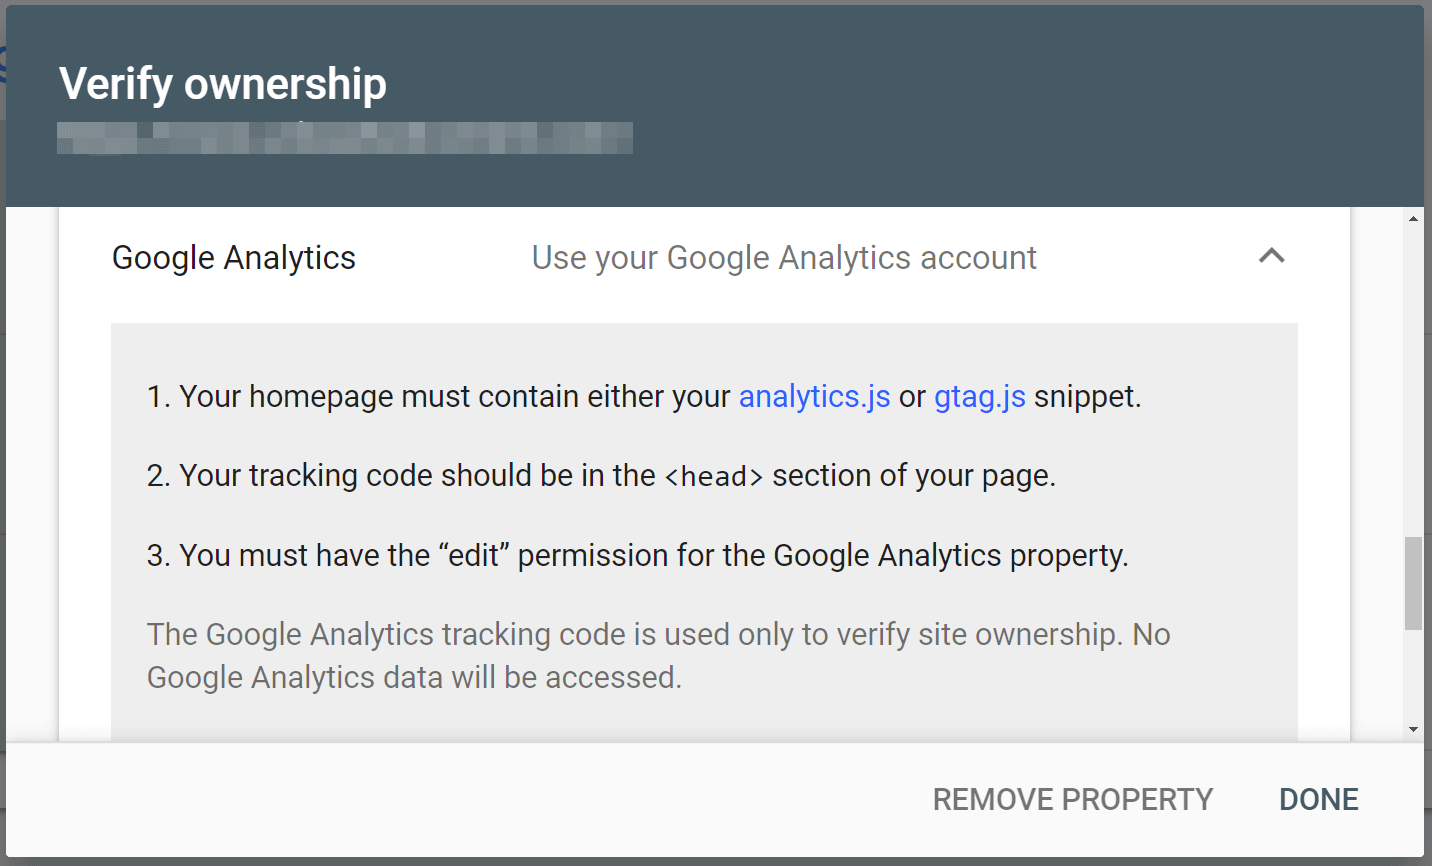
If you're already using Google Analytics in WordPress, this method can exist very straightforward. Even so, you lot'll demand to have a Google Analytics tracking snippet in your site's header department. Otherwise, this method can be unnecessarily time-consuming if yous just want to verify your website with Google Search Console.
Offset, you'll need to enter your website's address in the URL prefix box on Google Search Panel'south welcome screen. Subsequently yous select CONTINUE, roll down the pop-up box to find the Google Analytics dropdown option:
In a similar vein, you can verify your WordPress website with Google Tag Director. Nonetheless, you'll need to ensure that y'all have the container snippet in your existing site, or this method won't piece of work:

Simply click on VERIFY, and Google Search Console will scan your website for the corresponding code. If the verification is successful, you'll see the confirmation screen after a few seconds.
4. Add a TXT tape to your DNS configuration
All of the methods we've but discussed use the URL prefix verification. All the same, you lot can also verify your WordPress website with the Domain method. Y'all might prefer to use this option if you lot have subdomains or a mixture of URLs beyond both HTTP and HTTPS.
When yous open the Google Search Console welcome page, select Domain, enter your website's URL, and click on CONTINUE. Y'all'll now come across a TXT record specific to your site:
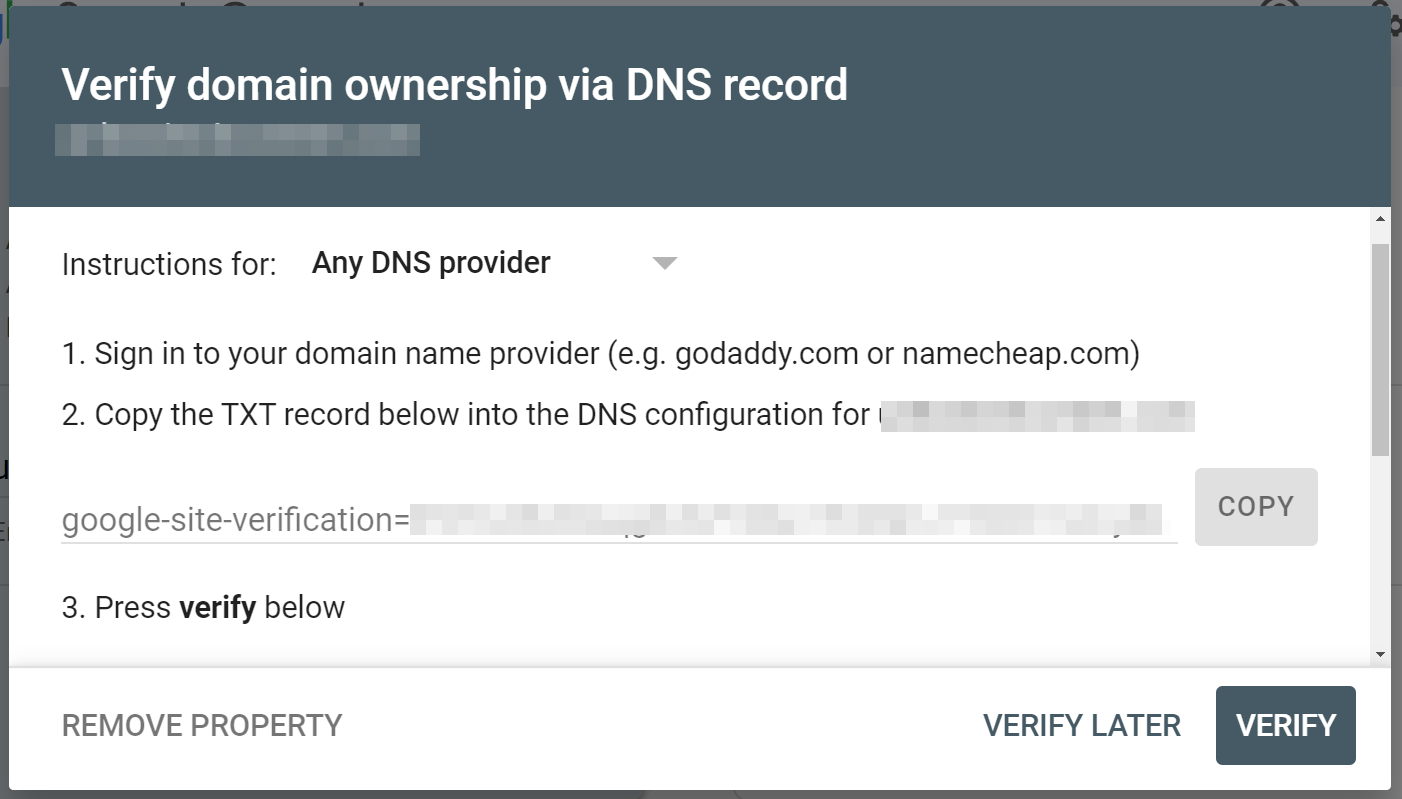
You tin choose your DNS provider from the dropdown menu to see more specific instructions. Then, copy your TXT tape and navigate to the location where yous manage your domain'south DNS.
Where y'all manage the DNS volition depend on how y'all've configured your domain name. Here are some possible options:
- Hosting control panel – if you've pointed your domain name to your web hosting by changing your domain's nameservers to your host's nameservers, you'll need to make these changes via your hosting dashboard.
- Cloudflare – if you're using Cloudflare, you'll make these changes via the Cloudflare dashboard.
- Domain registrar – this is the least probable situation. Nonetheless, if you left your DNS management with your domain registrar and pointed your domain name to your hosting using an A record instead of changing nameservers, you might need to manage your DNS from your registrar.
In most situations, you'll apply your hosting dashboard (unless you're using Cloudflare).
For this walkthrough, we'll show yous how to change your DNS record with Bluehost.
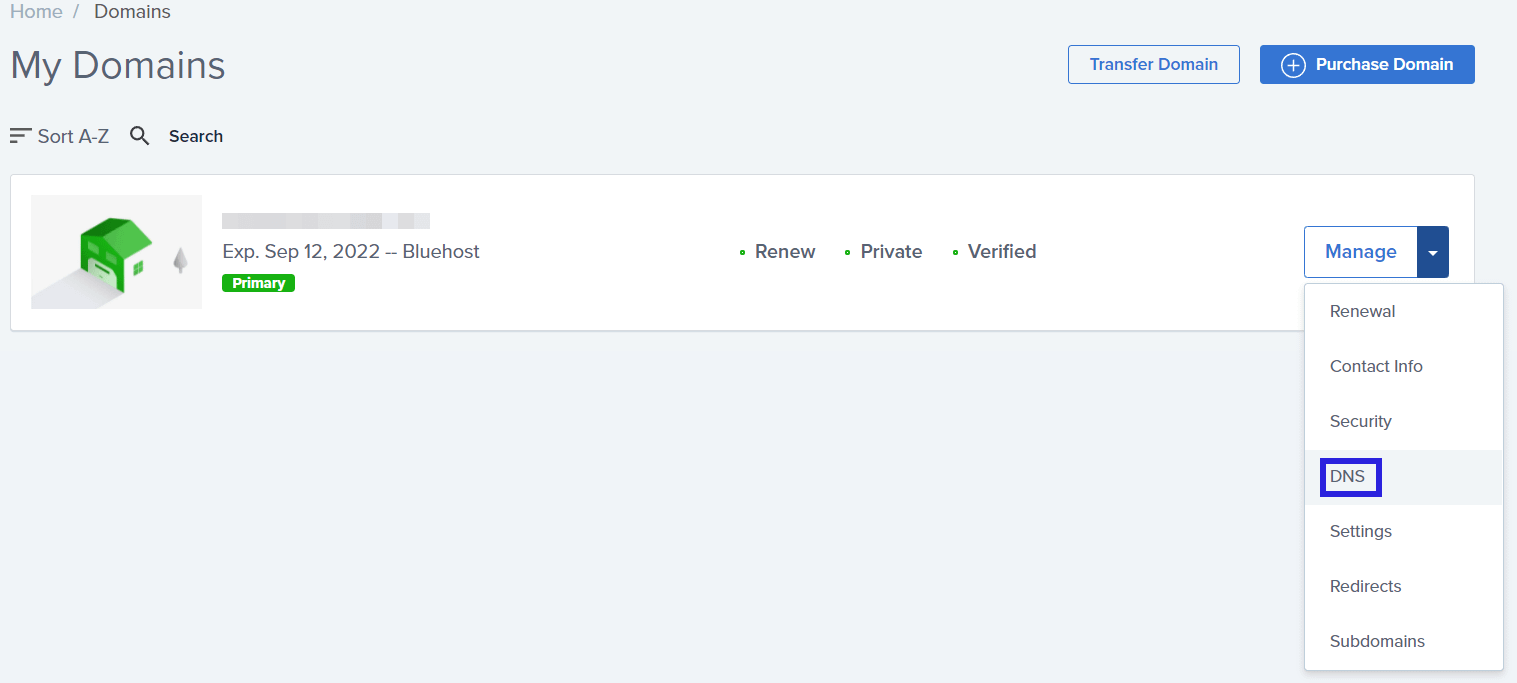
From your control panel, navigate to Domains and find the name of the WordPress website that you want to use in Google Search Console. So, click on the dropdown card arrow and select DNS from the available options:
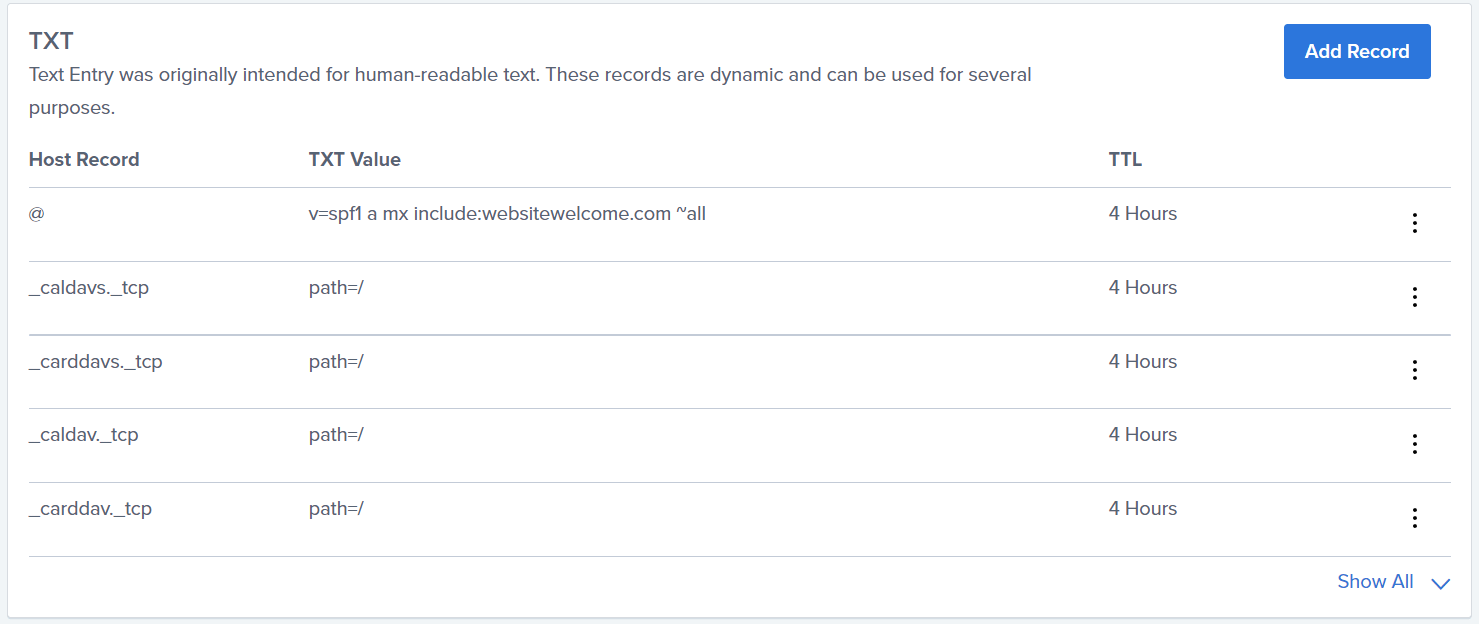
Scroll down the page until you find the TXT department. Here, yous'll need to click on Add Record to upload the TXT record for Google Search Console verification:
Y'all'll now run into a few dissimilar boxes to enter information. Paste your TXT record into the TXT Value box:
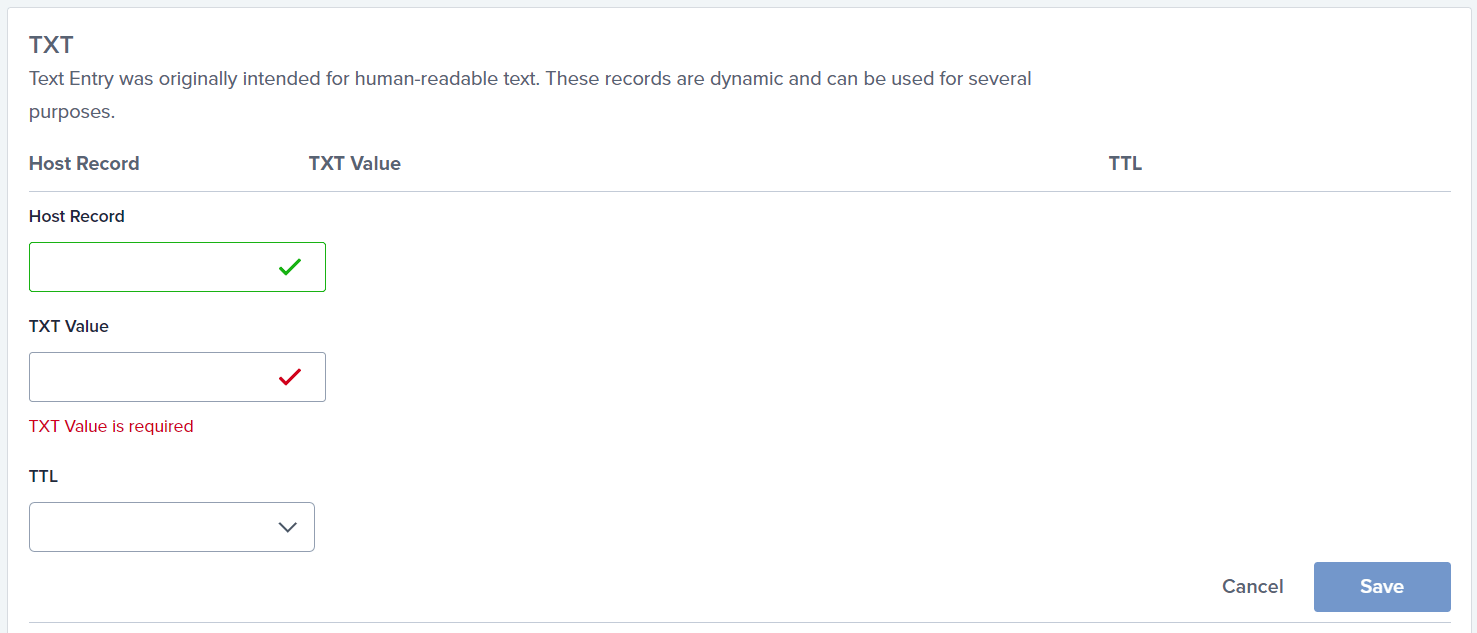
You lot can besides choose a Time to Live (TTL) value from the dropdown menu. TTL acts similar a timestamp that determines how long a packet of data volition exist before it is automatically discarded. You lot can choose a TTL value from 4 hours (the default) to seven days.
Once you're happy with all your entries, click on Save. Then, navigate back to Google Search Console and hit the Verify push to run across if the platform registers your DNS record.
Your website's DNS record might not verify immediately. It tin can take anywhere from a few minutes to a few days for your records to update completely. Therefore, if y'all have a little time, you lot might want to return to Google Search Panel in one day to see if your website is now verified.
v. Use the Yoast SEO plugin
Finally, you tin use the Yoast SEO plugin to verify your WordPress website. This SEO plugin enables you to optimize your content for search engines and human readers. Furthermore, this tool can assist verify your website direct from WordPress.
First, you lot'll need to copy your HTML tag verification code from Google Search Console. You can find it by following the instructions from the second method in this walkthrough guide.
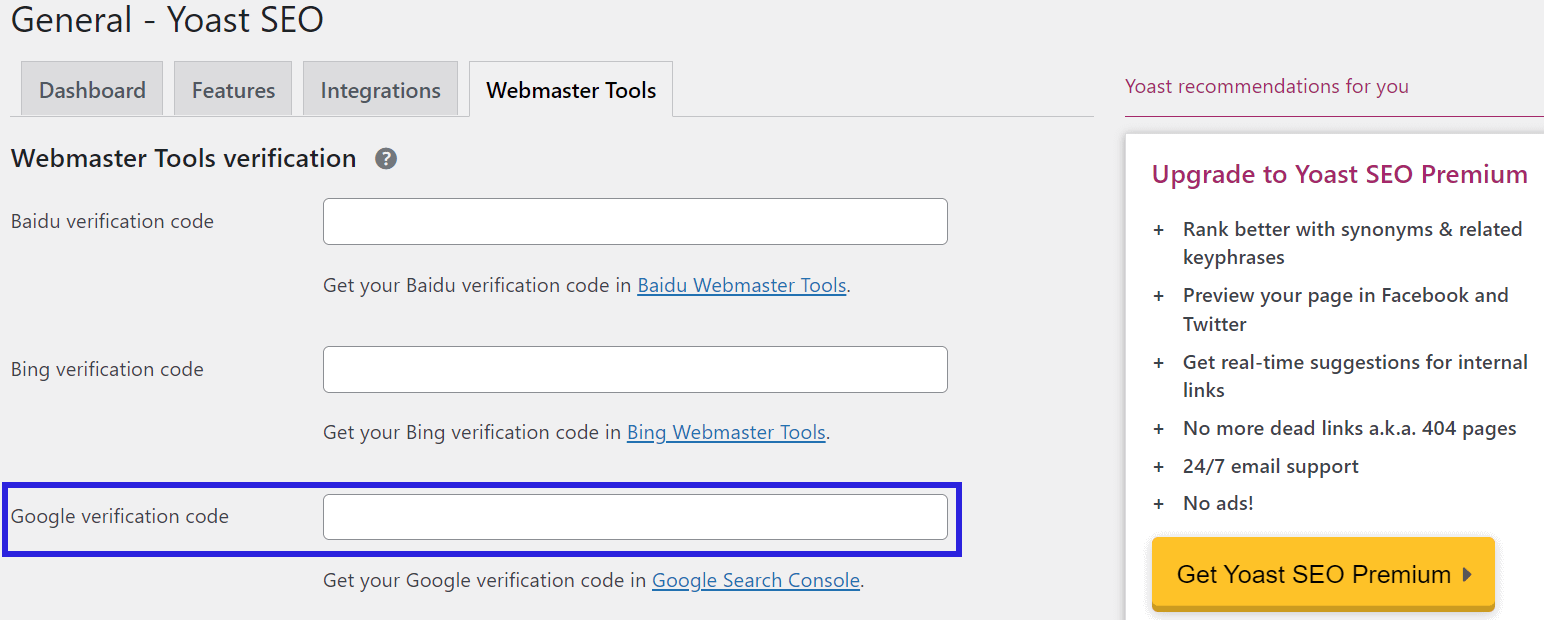
Next, caput to SEO > Full general > Webmaster Tools in your WordPress dashboard. Yous can then paste your HTML tag in the Google verification code box:
Once yous've pasted the code, click on Relieve Changes. Then, return to Google Search Console and hitting the VERIFY push button. You should at present see a greenish success message confirming your website's verification.
Get started with Google Search Console
Google Search Panel is an invaluable platform when optimizing your website for search engines and human readers. Yet, you'll starting time need to verify your site before y'all can start using the various SEO tools. Fortunately, you tin can utilise multiple methods to verify your site with minimal effort.
To epitomize, these are the v methods of Google site verification for WordPress websites:
- Upload a Google site verification file to WordPress.
- Add an HTML tag to your WordPress website.
- Verify your site with Google Analytics or Google Tag Manager.
- Add a TXT record to your DNS configuration.
- Apply the Yoast SEO plugin.
If you want to integrate your site with other Google services, you tin also use Google's official Site Kit plugin. Check out our Google Site Kit tutorial for more details.
In one case y'all've added your site, we likewise have a guide on how to submit a sitemap to Google Search Console.
Do you lot have any questions nearly Google site verification for WordPress websites? Let u.s. know in the comments section beneath!
Free guide
v Essential Tips to Speed Up
Your WordPress Site
Reduce your loading time by fifty-fifty 50-fourscore%
only past post-obit simple tips.
Download free guide
Source: https://themeisle.com/blog/google-site-verification-wordpress/
Post a Comment for "How to Upload Google Search File to Wordpress Blog"